Introduction
The following information is intended as a guide only to assist you in connecting your devices to the WiFi network. Each device is different, and each manufacturer may change names and locations of areas shown in this guide when new operating system versions are published. We are unable to provide an individual guide for each and every device and version available.
Once a device has been enrolled into the WiFi network, DO NOT re-enroll it to “fix” connection issues. This may work once or twice but will corrupt the network profile and security configurations for the network on the device and will lead to connection issues in the future. Should you have trouble with connection stability, please lodge a fault report and let us know you’ve tried to re-enroll. We can send you instructions on how to fix this.
For your security and privacy, we are not able to see into your devices to tell if they are having connection issues to the network. If you have any issues with the network or devices not connecting, please lodge a a support request. This Helpdesk is available 24×7 to any device with an internet connection. You can also reach it by joining the TWC-CONNECT WiFi network when at College. We cannot help if you don’t let us know there is a problem.
Due to the secure nature of the WiFi network, your computer/laptop, phone and tablet will need follow the enrollment process to install required a network profile and security configuration file which will let these devices authenticate to the network for service. Other devices, such as gaming or streaming consoles and e-Readers, will need to be manually added to the network via the device MAC Address. The reason for this is that these devices are unable to install the network profile & security configuration files which are needed to by each device to security connect to the WiFi network.
The Helpdesk website has information on how to locate the MAC Address for most gaming consoles, streaming devices and e-Readers. A form to request connecting the device is also available once you have this information. Once our Engineers receive your request and authorise the device, they will reply back via email. We suggest you monitor your email for updates.
Other devices may or may not be able to connect to the WiFi network. As some types of devices are generally designed to connect to home networks in a plug-and-play method, they sometimes do not offer a method to enter a username or password. We suggest you check with the manufacturer of your device for instructions in locating the MAC Address. There have been issues with some devices that will not connect to the WiFi network even after being authorised. Should your device not connect after the MAC Address has been authorised, you will need to refer to the Technical Support Team at your device manufacturer for further guidance.
Important Notes: Personal use of network routers, hubs, extenders and similar devices are prohibited as these devices cause major disruptions for other users. We are also unable to securely add Wireless Printers to the WiFi network as the printer becomes visible to all other network users who are then able to send print jobs to it. We suggest using a standard USB cable to connect your printer to your devices.
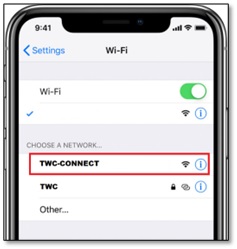
Begin by closing any web pages you have open on the device. Open the WiFi Networks area on your device and join the TWC-CONNECT WiFi network. This is an open network that does not require a username or password to join and offers limited internet services to assist devices getting enrolled into the secure WiFi network, so should not be used after completing the enrollment process.

When you first join the TWC-CONNECT network, your device may open what appears to be a webpage and go to the Onboarding website. If this happens, close the page. This page is not a full browser page and will not transmit required data to the Onboarding system correctly. Open a NEW web page using Chrome for Windows and Android devices, or Safari for Apple devices and manually enter to the Onboarding website address https://connect.thewomenscollege.edu.au You should see the introduction page:

Authentication Failed error message on Apple Devices: We have been finding that recent versions of Apple devices and/or Safari browser sometimes do not load the Onboarding website and may display an error that Safari cannot establish a secure connection to the server. This appears to be occurring due to some newer security configurations within the Safari browser itself. To resolve this, ensure you are connected to the TWC-CONNECT WiFi network, then try the following steps:
If that does not work, try the following suggestions to see if you are able to resolve the issue:
1 – Turn of iCloud Private Relay: go to Settings/System Settings – your name/AppleID – iCloud – Private Relay and turn it off temporarily
2 – Turn off Safari’s tracking: open Safari – Settings – Privacy and turn off Website Tracking.
3 – Make sure Airplane mode is disabled
4 – Clear your Safari History and Website Data: open Settings – Safari, then click the link to Clear History and Website Data shown below the Privacy & Security section
5 – Disable all ad blockers, browser extensions, antivirus and other security application, internet performance enhancements and VPN services
If you are still having difficulty, try again using the Chrome browser. If this also does not work, restart the device in Safe Mode to disable all applications and add-ons, then follow the enrollment procedure again. If successful, once completed you should be able to restart in normal mode and re-join the normal TWC WiFi network.
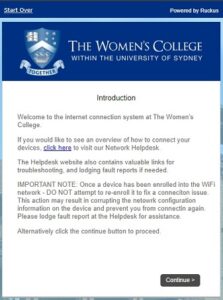
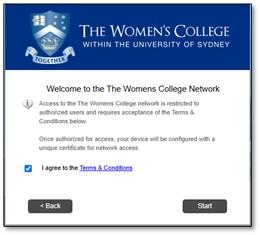
Press the CONTINUE button at the Introduction page to begin, then accept the Terms and Conditions on the next page and click START.

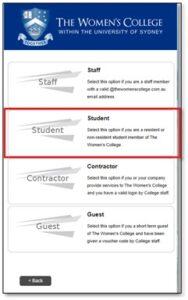
Select your account type as STUDENT.

The screen will change asking for your internet account USERNAME and PASSWORD. Use the details shown in your Welcome to College email message and then click CONTINUE.

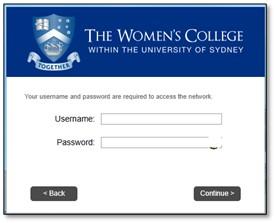
NOTE: If you are seeing an error page indicating an AUTHENTICATION FAILED error, it is possible that you may not have entered your username and/or password correctly. Your username is in the format of firstname.lastname as shown on your Welcome email message. If the error continues, lodge a fault report at the Helpdesk website.
We have been advised that some Apple devices are having difficulty with symbols in surnames after a recent update. If this is the case, we suggest you copy the username from the Welcome email message and then paste it into the username field. Alternatively, temporarily disable the Smart Punctuation feature on the device until you have successfully enrolled the device. As a general guide, go to SETTINGS, then GENERAL and then KEYBOARDS, locate the SMART PUNCTUATION feature and turn it off. Once enrolled, go back into this area to turn the feature back on again.
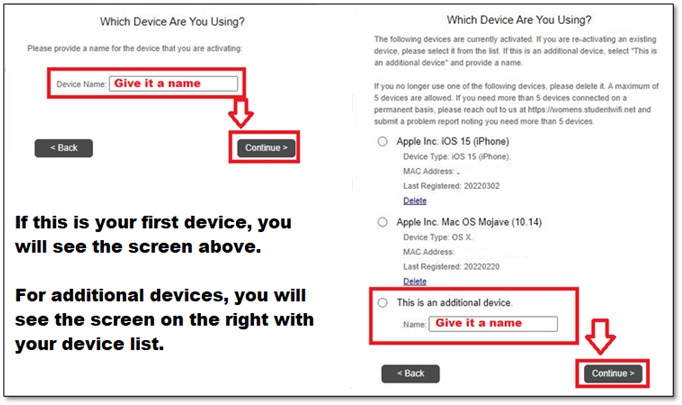
If this is your first device being connected to the network, enter in a name for the device in the DEVICE NAME field and click CONTINUE. The device name is simply a name you will see on your enrolments list to help you identify your devices in the future. If this is an additional device, use the option THIS IS AN ADDITIONAL DEVICE to give it a device name and click CONTINUE.

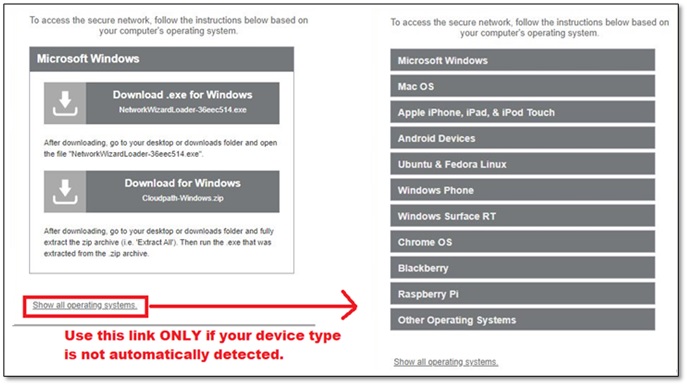
The Onboarding System should now detect your device type and show you options to download the correct configuration files for your operating system. As the WiFi network at College is a secure network, these files are required to ensure your device can securely connect to the network. If you do not see your device type shown, use the SHOW ALL OPERATING SYSTEMS link at the bottom of the page to display a larger list of options.

The following are general guides for connecting most Windows, Apple and Android devices. Some areas described may be different depending on your specific device and/or operating system. You may need to refer to your device manufacturer for guidance on your exact device and/or operating system.
WINDOWS DEVICES – The Cloudpath Onboarding system should detect the operating system your device and display a page with a couple of options for Windows. Click on the DOWNLOAD .EXE FOR WINDOWS button file to download the configuration file, then go to download area and run/open the file to begin the installation. On some devices, additional security warnings might display regarding the installation of a security certificate. You must click the YES button to complete the installation.
APPLE DEVICES –The Cloudpath Onboarding system should detect the operating system your device and display a page with several profile options for Apple products. You should know what Operating System version you have so you select the correct file.
– For MACOS 10.15 and earlier, click on the EXECUTABLE FOR MAC OS 10.15 & PRIOR configuration file.
– For MACOS 11 and LATER, click on the PROFILE FOR MAC OS 11.0+ configuration file.
The file should automatically download to your device and a window should pop up showing you the steps to proceed. If it does not, go into the MAIN screen on your device and click SETTINGS. Open the PROFILE DOWNLOADED section, then click the INSTALL button at the top right of the Install Profile screen. This location has changed with every Apple device and version, so we are unable to provide an exact location for every version.
– If prompted, enter your DEVICE passcode and then continue. This is not your network account username and password
– If prompted, install the ROOM CA CERTIFICATE
– If prompted, CONFIRM the installation of the profile
ANDROID DEVICES – You may be presented with a page showing a button to download the CLOUDPATH APP. Clicking on this button should open the Google Play Store and present you with the RUCKUS CLOUDPATH by Commscope app to install. Install the app to continue. If the Cloudpath system does not open the Play Store and locate this app for you, you can locate it by searching the Play Store yourself.
After installing this app, open the DOWNLOADS section and locate the CLOUDPATH-x.APK file (where x is the version number). Double click on the APK file to start the installation process and select a NEW INSTALL. You must grant the Cloudpath application permission to access your location as this is a required permission for the app.
After successfully enrolling your device, you should be shown a success window confirming the device has been connected to the network. Your device should automatically connect to the TWC WiFi network. If it does not, open your WiFi networks section on your device and tap the TWC network to connect.

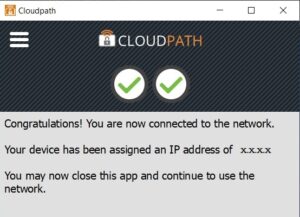
IMPORTANT: Once you have successfully enrolled your device to the network, we recommend you move the TWC network to the top of your networks list if at all possible. Should your device become disconnected and attempt to auto-reconnect, it will likely try to connect to the first network in the list.
We also suggest you leave and forget the TWC-CONNECT network in your WiFi Networks area. The TWC-CONNECT network is only available to securely connect to the Onboarding System and does not provide full internet service. If you need to access this network again in the future, such as to visit the Helpdesk, you can simply join it again then.
If you would like a copy of these instructions, you can download a PDF version from this link: General Connection Guide